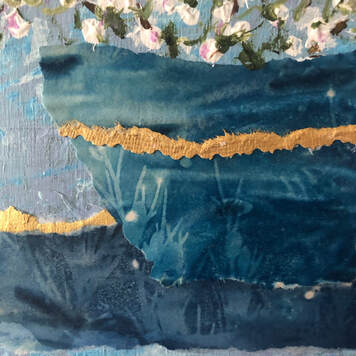
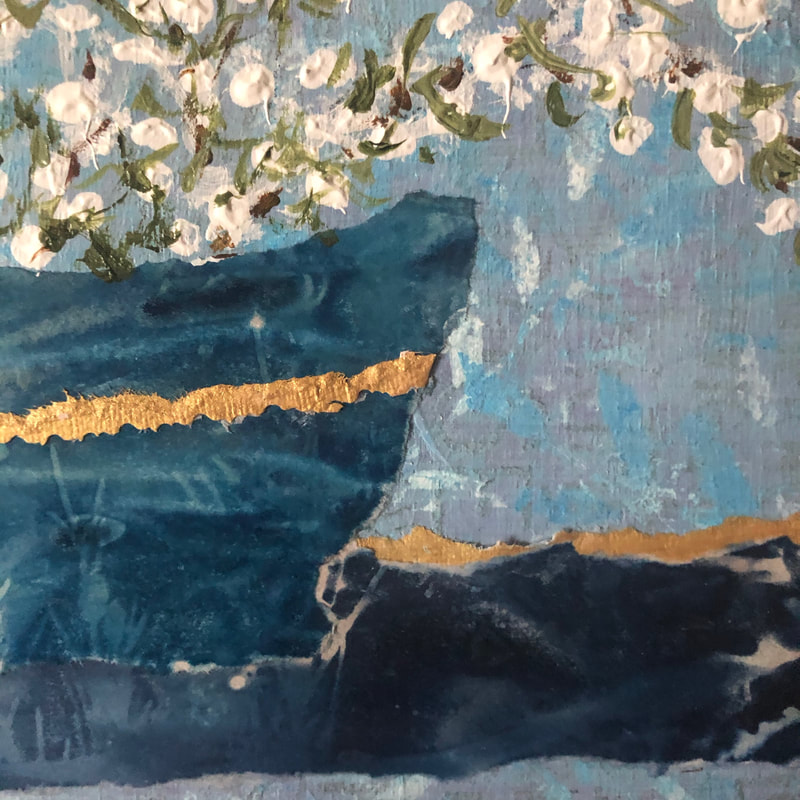
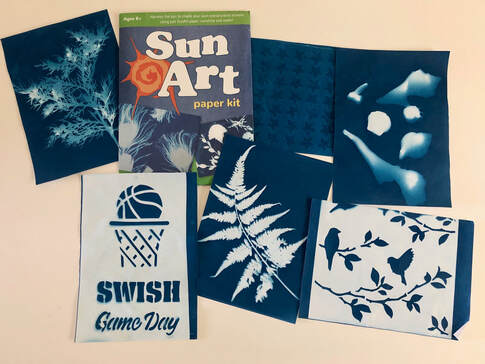
CBoggsArt
  • Home
  • NEW WORK
  • Blog
  • Etsy Art
  • Etsy Jewelry
  • YouTube
  • Meet the Artist
  • Contact
  • Privacy and Cookies

Two Easy Cyanotype Embellishments

12/18/2021

 
A blue and white cyanotype print is lovely all on its own, but sometimes the image just seems to need a little something more. One easy way to bring out the best in your cyanotype prints is to add outlining or details with a white gel pen. My favorite is the Sakura Gelly Roll size 08 pen, which you can easily find at most craft supply stores and online. 
Another easy way to embellish your cyanotype prints is to print over the image with acrylic paint. I especially like the look of silver, gold, and copper metallic paint with the deep blue and clean white of a cyanotype image. I use Golden and Liquitex brand acrylic paints, but any thick acrylic brand will work. For the image below, I brushed gold acrylic to the back of the same leaves that I had used to make the cyanotype print. After putting the leaves paint side down on the paper, I covered it with paper towel and gently pressed the leaves. Lift off gently, and you now have a lovely shimmer on the finished piece!
The mat for this image was created using cyanotype sensitizer solution and a stencil with random holes. The stencil was somewhat translucent, so the resulting image is a subtle dot pattern. Gold acrylic was added to the beveled edge of the inside mat opening. The biggest problem with this technique is rinsing the cyanotype solution after exposure to sunlight. The paper layers of the mat separated and had to be glued together using mat medium. I like the effect, but the technique needs refining! 
Picture

Cyanotype in Mixed Media Art

5/19/2021

 
Picture
   

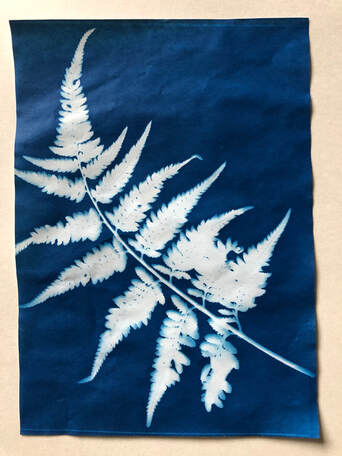
Although I love the simplicity of a fern leaf cyanotype print, and have a box full of similar prints ready to mat and frame, there are always new ways to explore a familiar medium. During the winter months, when sun-brightened days
were few and far between, I spent my studio time exploring ways to use my accumulated stash of prints as elements in my mixed media art.  
   

Less than perfect images are easily cut or torn apart to be used to create flower pots, tabletops, or backgrounds to write on.
Picture
Picture
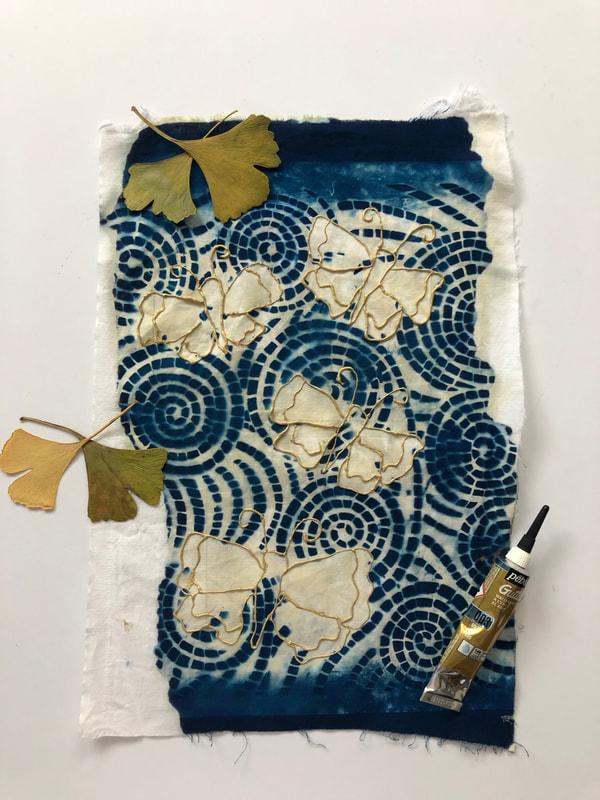
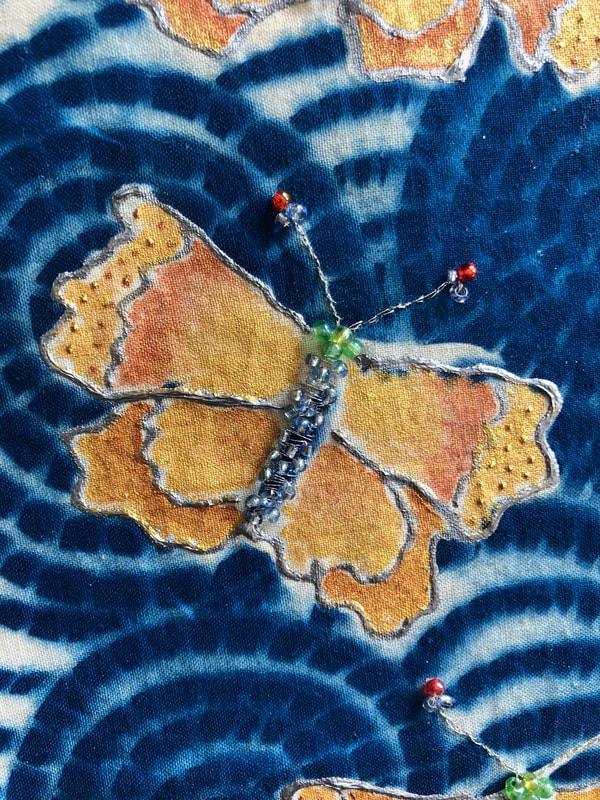
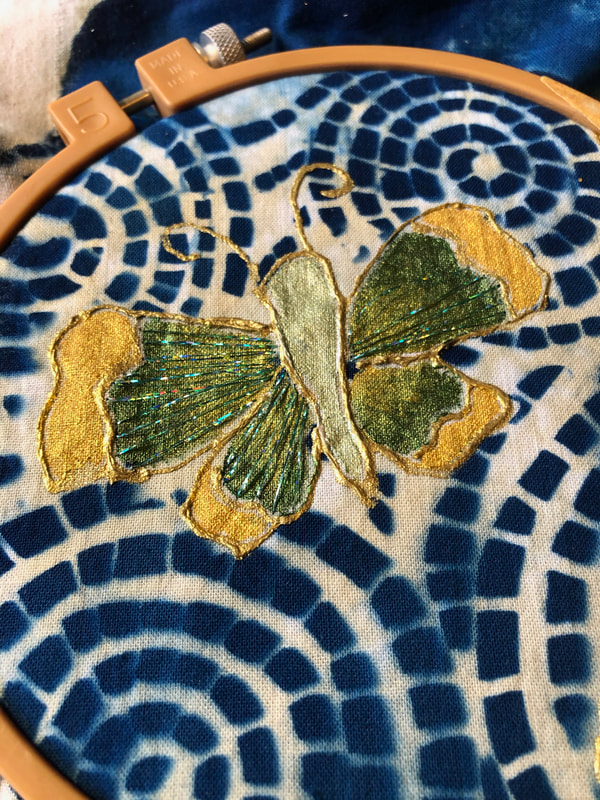
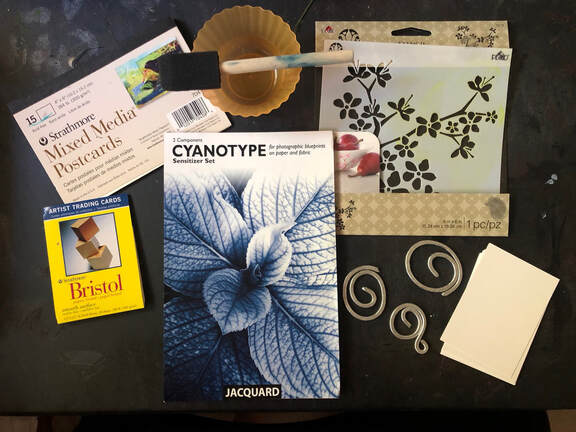
Cyanotype solution can also be used as a dye to color papers and natural fibers such as cotton and silk. I often use up leftover cyanotype solution on yarn, strips of cotton lace, or handmade papers to add to my options for decorative elements in a mixed media collage.
Picture
Picture
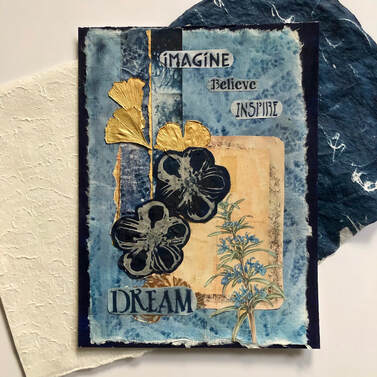
To learn how I made the silver flowers in "Dream", visit this free tutorial on my YouTube channel.
To learn more about creating your own cyanotypes, check out this class on my Skillshare site. When you do, you'll be invited to a 14-day free trial membership to this amazing site with classes in the arts, crafts, photography, writing, and technology. Check it out today! 
Picture

Three Ways to Use Cyanotypes in Your Art

4/1/2021

 
Traditional cyanotype prints are lovely all by themselves. The simplicity of a deep cyan blue background with white images of flowers, leaves, and grasses is quite satisfying. But every now and then, you end up with pieces that don't quite work out. In this post I'll share some easy ways to use those unloved prints to create mixed media art suitable for framing.

Add cyanotype elements to a painting....

This mixed media painting was done using acrylic paints, stencils, and brushwork on 10x10 inch cradled wood. Tearing the shapes will give a softer effect. I use matte gel medium as my adhesive. 

Use multiple cyanotype elements to create a collage...

Picture
This collage used several cyanotype papers along with some painted gingko leaves and images printed from an online download that I purchased from Vectoria Designs on Etsy. The flower shaped cyanotypes were made on silk fabric. You can learn how to do that in my YouTube video here. I used matte gel medium to glue the pieces to a sheet of handmade cotton rag paper with a stenciled leaf print cyanotype. The finished collage was then glued to a dark colored mat board using the gel medium. 

Stitch a fabric cyanotype...

Cyanotypes can be made on cotton or silk fabric using the same process you would use on paper. The key to success is to prewash your fabric to remove any sizing that might affect the color after exposure to sunlight. 
I use Pebeo gutta to outline the wings and body.
This butterfly is finished with metallic acrylic paint, metallic thread, and beads.
This butterfly is painted with metallic acrylic. Metallic thread is used on the wings.
To learn more about cyanotypes, check out this blog post. You can also visit my Skillshare channel for a class with step by step instructions. This link will give you a 14-day free trial membership to Skillshare. You'll be able to access not only my class, but many more on art, digital photography, sewing, writing, technology, and many more! 
Picture

Easy Sun Prints with Kids....

9/12/2020


Are you a first-time home school parent looking for a way to add more art to your lesson plans? Or are the kids in a hybrid plan at school this year with less time for the arts at school?
Cyanotypes, or sun prints, are a great way to combine an easy, no-mess creative activity with a simple science lesson!
 

First a little science background...

A cyanotype is a form of photo printing that uses sunlight to form an image on a chemically treated paper or other surface. The process was invented by Sir John Herschel in 1841 and was used by engineers and architects to make technical drawings called "blueprints" because of the high contrast blue image that was produced. Blueprints were made in this manner well into the 20th century. Photographers and artists also used this process to create botanical prints and for proofing photographic negatives. Today, artists use this nineteenth century technique in many creative ways, incorporating it into stand alone and mixed media artwork.
​
Two chemicals are mixed to make cyanotype solution: ferric ammonium citrate and potassium ferricyanide.  The chemicals are diluted with distilled water, mixed together in equal proportions, then applied to the paper or fabric on which the print will be made.
​(NOTE: The sun print paper in these kits has NO toxicity dangers, even if you purchase the "do it yourself" mixing kit to make your own sun print paper or fabric. Like all science and art materials, keep the paper away from your face and wash your hands after using. That's basic safety for any materials used in science or art!)

Once the paper is dried, objects are placed on the paper, which is then exposed to bright sunlight. The ultraviolet (UV) light from the sun reacts with the iron salts on the surface in a process called oxidation. After exposure, the paper is immersed in running water to wash away the excess iron salts, leaving behind a white image on a deep blue background.  The amount of contrast between the white and blue areas is determined by the amount of sunlight hitting the surface. Objects that are opaque and lie flat on the surface will appear as a high contrast white, while objects that are translucent or three-dimensional will allow the surface to be exposed to varying degrees of UV light, which creates a shadow effect between the lightest and darkest areas of the surface. 
NOTE: The highlighted terms are not live links, but make for a good opportunity to add a vocabulary lesson! 

But no worries! No mixing of chemicals is required for this lesson...

Sun Print papers are ready to use without any chemistry, which makes this introductory lesson perfect for younger children. Click here or on the image below to access my YouTube video for the complete demonstration! The Sun Art paper kit that I used for this video is available on Amazon. Another good quality kit for young children is Super Sunprint Kit, also available on Amazon.
Picture

To learn more...

If you're working with older children or teens, the two chemicals are available as a kit at most craft stores or on Amazon. This allows the young artist to mix the amount needed to prepare paper and fabric in a variety of types and sizes to create unique cyanotype prints. The chemicals are safe to use when directions are followed, although I consider adult supervision necessary with elementary and middle grade kids to minimize risk and the mess caused by spills! 
To learn more about this process, I have a Skillshare class that you can access here: Cyanotype Prints for Your Mixed Media Art. 
​
NOTE: Skillshare is a membership site which offers hundreds of classes taught by experts in different fields: the fine arts, crafts, business and marketing, computers, photography, and many more. With my link, you will be invited to a two-month free trial which will allow you to access every one of the classes offered on Skillshare. There is no obligation to continue with a paid subscription once the free trial ends. 

After you check out my free YouTube tutorial, share your results to Instagram with #cboggsart2. I'd love to see your cyanotypes! 

Picture

Works in Progress... Cyanotypes

8/23/2020

 
We've had a stretch of hot, dry, sunny days this summer, which have been perfect for experimenting with cyanotype prints. I had made "sun prints" in the past using commercially available pre-treated paper, which is fun, but mixing my own cyanotype solution has taken the process to a whole new level! 
Picture
I purchased a set of cyanotype chemicals at a local art supply store, followed the simple instructions, and began to harness the power of the sun to create beautiful deep blue prints on a variety of materials - watercolor and mixed media papers, handmade papers, and cotton and silk cloth. 
Natural plant materials, stencils, found objects, and digital photo negatives provided the templates for the designs and patterns. I now have a collection of lovely cyanotypes in varying shades of cobalt blue to use in my mixed media art!
These prints are now all part of "works in progress" that I'll be working on even when the sunny outdoor days have ended and cold winter winds are blowing across the Ohio landscape.
To learn how to make your own cyanotypes, click here or the photo below to check out my Skillshare class! On Skillshare, not only will you be able to access all my art classes, you'll have access to hundreds of other classes for art, crafts of all kinds, photography, technology, and many other fascinating topics! One click will get you a two-month free trial subscription to a world of new things to learn! 
Picture
​And if you do try experimenting with cyanotypes, be sure to share your work either on my Skillshare class page or on Instagram with #cboggsart2. Until then, enjoy the sunshine!
Picture

Creative Family Fun...Teacher-Tested, Kid-Approved

5/19/2020

 
Depending on where you live, school may be ending for the summer in the next few weeks. Although as a parent, you may be glad to see this crazy time of "distance learning" and Zoom chats coming to an end, it also means more time to fill, especially if your area is not yet opening summer camps and other activities. And even if the neighborhood kids are able to get outside to play a pick up baseball game in the yard or park, sooner or later the rain will come and you'll be faced with cries of "I'm bored, Mom" and "What can we do, Dad? 

Since this pandemic began, many creative people have been sharing ideas for keeping children and teens engaged in learning beyond their digital classrooms. You'll find us on YouTube, Facebook, Instagram, and our own websites. 

I teach art lessons for teens and adults on my Skillshare Channel, but that's a membership site and I know that right now money is tight for many of us. So I'm working on bringing some of my teacher-tested, kid approved art activities to my YouTube Channel, where you can access them at no cost. 

The first ones are ready now and more are on the way in the next few weeks. Check out this slideshow to see what's available now! Click here to visit my YouTube Channel to get started! And follow me on Instagram to be the first to know when new tutorials are posted! 

If you do try any of these activities with your kids at home, please share them on Instagram with #cboggsart2. I’d love to see what your creative kids have accomplished! 
Picture

It's Valentine Time!

1/30/2020

 
Are you tired of trying to find just the right greeting card for someone special? Often spending way too much time deciding between cookie cutter cards that all look alike and even have the same words? And worse yet, do you sometimes wonder if you've already sent the one you're considering...more than once...to the same person?
Picture
Your loved ones aren't ordinary, so why settle for an ordinary card from the local card shop?
In my latest Skillshare class, Tooling Foil Valentines, you'll learn how to craft beautiful cards using tooling foil and some basic art supplies, many that you may already have on hand. I'll be demonstrating with a Valentine's Day theme, but you can apply this technique to any holiday or special occasion!
Picture
I’ve even included a pdf template with sample drawings and a list of the supplies you’ll need to complete your foil tooling project. 
Once you try this easy to learn technique, you'll be able to design and create unique cards for all occasions! ​
Picture
Check out a little preview below:
Happy heARTing! 
Picture

TIME FOR A COLOR CHANGE!

1/2/2020

 
Do you have a favorite color? You know, the one you always seem to  choose for your wardrobe ... your home ... maybe even your car? Or do you have a different color preference for each of those areas of your life? I used to think that last description fit me best. My wardrobe is predominantly blue and black, my home leans toward neutrals with an occasional splash of blue and green, and my car is a silvery tan color. 
When I looked at collections of my paintings and other artwork, I saw the same color choices, with a very strong preference toward green. ​
I was pretty sure that my paint palette needed some brightening, but I had no idea how much until I used Year of Color on my Instagram feed! I expected to see lots of green since my tubes of sap green hue and chromium oxide green are always needing replacement, but all these grays, tans, and browns took me by surprise. It's definitely time to brighten up my palette! ​
Picture
​

The little circles of chartreuse, bright blue, and red gave me hope and a place to start, so I came up with an action plan for the new year... 
Picture
January 1, 2020 #aquajanuary with @kickinthe creatives (Watermedia challenge)
For this first week of 2020, the focus color is YELLOW. Bright, clear yellow ... soft, yellow with a hint of orange ... maybe even a little chartreuse to liven things up! 
Picture
January 2, 2020 #quickkickjanuary with @kickinthecreatives (Abstract Photo challenge)
If I stick with the plan, in six weeks I will have added a rainbow of colors to my paint palette and a much brighter look to my Instagram feed! Truthfully though, I am looking forward to "green week"! 
Picture
Ice painting... a great way to take advantage of a close to zero winter day!
Follow me on Instagram to see if my plan for colorful transformation is successful ... and have a very happy, colorful 2020! 
Picture
<<Previous

​Copyright 2023 CBoggsArt and Charmaine Boggs. This website is my personal property and as such content, photographs, and downloadable products may not be copied, altered, or distributed for sale without my written consent. I can be contacted at c​harmaine@cboggsart.com. Permission to pin blog content is granted provided proper attribution is included. ​The views expressed on this website are mine and mine alone and do not reflect the views of my employer.

  • Home
  • NEW WORK
  • Blog
  • Etsy Art
  • Etsy Jewelry
  • YouTube
  • Meet the Artist
  • Contact
  • Privacy and Cookies